Sunday, 29 April 2012

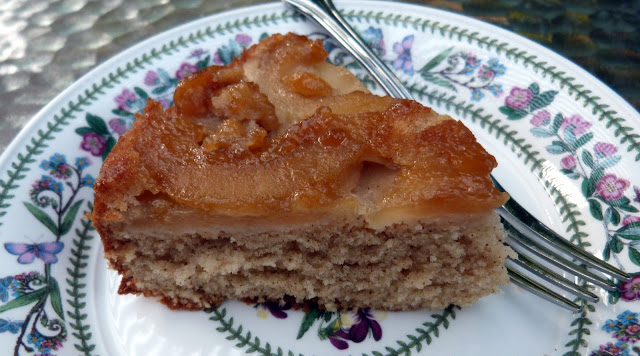
Maple Apple Upside-Down Cake

Sometimes it's really not that bad having to make your own birthday cake.  Case in point:


I made an adjustment to the following recipe when I made it today - I didn't have a 10-inch cake pan, so decided to make two 8-inch cakes instead.  I can do that, dammit; I'm a grown-up.  And besides, it's my birthday.  In order to do this I changed the following:
  • increase maple syrup to 1 ¼ cups
  • increase apples to 4
  • baking time decreased to about 50 minutes - just keep an eye on it.
So, moving on to the pertinent stuff, namely THIS: 


Maple Apple Upside-Down Cake

1 cup pure maple syrup
3 Granny Smith apples, peeled, cored and sliced - one of those old-fashioned apple peelers is highly recommended!
2 cups flour
1 teaspoon baking powder
½ teaspoon baking soda
1 teaspoon salt
1 teaspoon cinnamon
½ teaspoon allspice
3 large eggs
¾ cup buttermilk
2 tablespoons apple liqueur (optional, but a nice addition if you have some)
1 tablespoon vanilla extract
1 ½ sticks unsalted butter, softened
1 1/3 cups sugar

Preheat oven to 350F.  Grease and flour a 10-inch round cake pan.  In a small saucepan, bring the maple syrup to a boil over high heat, then simmer over low heat until very thick and reduced to ¾ cup, about 20 minutes.  Pour the thickened syrup into the cake pan.  Arrange the apples in the pan in 2 concentric circles, overlapping them slightly.  

In a bowl, whisk the flour, baking powder, baking soda, cinnamon, allspice, and salt.  In a small bowl, whisk the eggs with the buttermilk and vanilla (and liqueur, if using).  In the bowl of a standing electric mixer fitted with the paddle, beat the butter and sugar at medium speed until fluffy, about 3 minutes.  Beat in the dry and wet ingredients in alternating batches until the batter is smooth; scrape down the side of the bowl.

Scrape the batter over the apples and spread it in an even layer.   


Bake the cake for 1 ½ hours, until golden on top and a toothpick inserted in the center comes out clean. Let the cake cool on a rack for 30-45 minutes.  Place a plate on top of the cake and invert the cake onto the plate; tap lightly to release the cake.  Remove the pan gently.  Let the cake cool slightly before cutting.


Thursday, 26 April 2012

This Post Is Total Pants

One of the things that struck me when I visited Italy a few years ago was... not the architecture, which is magnificent... nor the food, which is delectable... nor the beauty of the country, which is eternal... it was Italian men's trousers.  It was not just that they dressed differently - with the ubiquitous jumper draped about the shoulders, such as we in America saw with the preppies in the 1980s, and the weird-looking bowling shoes... no, it was the colours they wore.  A garish rainbow of gelato-colours!  Frambroisey pinks, screaming vermilions, blazey yellows, pistachio greens - extraordinary!  And certainly nothing any self-respecting American male would be caught dead in.  Here were men who were either utterly secure in their masculinity, or so dreadfully astray of the path of good taste as to be obliviously farcical.  Perhaps they were both.

After being accosted at every turn by these colourful creatures, I began to surreptitiously photograph them when I could, so amusingly peacocky were they as they strutted through the streets, sun reflecting glaringly off of their showy plumage.  Here, for the delectation of your rods and cones, are a few:


L'arcobaleno!


Sez Who? Sesame, That's Who!


This couldn't be easier - some stuff in the blender, a few vegetables chopped, some noodles boiled - toss it all around in a pan, and there you go.  In fact, you could make the sauce the night before and heat it up when you get home from work to cut the cooking time a bit more.  It has a powerful nutty/salty/sweet flavour - I'd probably add more chili paste (perhaps double, because I like the spice), but do as suits you.  I also added some stir-fried snow peas - you could also try water chestnuts, stir-fried broccoli, or other veg.  Thin strips of beef cooked on the grill wouldn't go amiss, either...

Sesame Noodles with Peanut Sauce*
 
1/4 cup sesame seeds
1/2 cup chunky peanut butter
4 cloves garlic
2 tablespoons fresh ginger, minced
10 tablespoons soy sauce
4 tablespoons rice vinegar
1 tablespoon chili garlic paste
4 tablespoons light brown sugar
Hot water

16 ounces noodles
2 tablespoons toasted sesame oil
4 scallions (green onions), sliced thin on diagonal
1 medium carrot, grated


Toast the sesame seeds in a medium skillet over medium heat, stirring frequently, until golden and fragrant, about 10 minutes.  Reserve 1 tablespoon sesame seeds in a small bowl.  In a blender or food processor, puree the remaining 3 tablespoons sesame seeds with peanut butter, garlic, ginger, soy sauce, rice vinegar, chili paste, and brown sugar until smooth, about 30 seconds.  If sauce is too thick, with the machine running add hot water 1 tablespoon at time until the sauce has the consistency of heavy cream – slightly  thickened but pourable.  Set blender jar or workbowl aside.


Cook noodles according to package directions.  Rinse noodles well and drain.  Put noodles either in a large bowl or the pot you cooked them in.   Toss noodles with sesame oil using tongs until evenly coated. Add scallions, carrot, and sauce; toss to combine. Divide among individual bowls, sprinkle each bowl with portion of reserved toasted sesame seeds, and serve immediately.  (May need slight heating in microwave)


*Errrr.... may contain peanuts...

Sunday, 22 April 2012

Pineapple Chicken

This recipe is based on honey glazed chicken with a few experimental alterations - I was very pleased with the results!  The method is the same, there are just different elements to the sauce and the addition of pineapple and almonds.  This time I made steamed rice to which I added peas and slivered carrots at the end to steam along with the rice.


Pineapple Chicken

2 lbs diced uncooked chicken breast
1/3 cup flour
Salt and pepper to taste
2 tablespoons butter
1 cup pineapple tidbits (diced canned pineapple – drained, juice reserved for glaze)
¼ cup sliced or slivered almonds, toasted

Heat oven to 350F. 
In a shallow dish combine the flour, salt, and pepper.  Dip each piece of chicken in the flour mixture and coat evenly.

Melt 2 tablespoons butter in a shallow baking dish, large enough to accommodate the chicken in a single layer.  Arrange chicken in pan and bake uncovered for 30 minutes.

While chicken bakes, melt together in a small saucepan:

2 tablespoons butter
¼ cup honey
1 ¾ cups pineapple juice
2 tablespoons soy sauce
½ teaspoon cayenne pepper
½ teaspoon ginger
1 tablespoon apple cider vinegar

After chicken has baked 30 minutes, turn each piece over and pour sauce mixture evenly over chicken.  Add in pineapple tidbits.  Bake another 15 minutes, and then turn broiler on low until sauce consistency thickens and caramelises into a glaze, basting/turning frequently with a wide spatula.  Sprinkle with almonds after dishing onto plates.


My Grandmother's Waffles

Simple, easy, and light... (and a perfect way to use up some of those bushels of strawberries you voraciously and foolishly bought.  And by you, I mean me.)


2 cups Bisquick
1 egg
1 small bottle (1.25 cups) club soda
scant 1/3 cup vegetable oil

Mix all ingredients together, trying to get out as many lumps as you can.  Use in your waffle iron according to manufacturer's directions.


For variation: replace a little bit of the club soda with orange juice, add a few drops of orange extract, a tablespoon of grated orange zest, and a sprinkle of cinnamon.

Make this to go with it: 

Orange Syrup

1 cup sugar
2 teaspoons grated orange rind
1/2 cup orange juice
1 tablespoon lemon juice
1 tablespoon corn syrup
1/2 teaspoon vanilla extract
2 tablespoons orange liqueur

Combine all ingredients in a heavy saucepan; bring to a boil over medium heat.  Reduce heat and simmer, stirring occasionally, for about five minutes or until sugar dissolves.


Saturday, 21 April 2012

Baked Strawberry Pie with Crumble Topping

It's strange that every other type of berry pie you see requires baking, but strawberries get relegated to simply being glazed with gelatinous goo, as if they're too rarefied to be cooked.  That's a shame, because baked strawberry pie is really good in a homey, simple kind of way.  It does get quite mushy, it's true, more so than other berries do, but with a crumb topping and a bottom crust to give it a bit of texture, and my usual accompanying custard/cream/ice cream recommendation, it has a delicious puddingy quality - just serve it in a bowl with a spoon, as getting clean slices from this (even when completely cooled) can be challenging.


Baked Strawberry Pie with Crumble Topping

1 store-bought 9-inch pastry round (or make your own if you’re industrious)
½ cup sugar 
¾ cup all-purpose flour
6 tablespoons butter
¼ teaspoon ground nutmeg
4 cups fresh strawberries, hulled and sliced in half
½ cup sugar
½ cup all-purpose flour
1 tablespoon cornstarch 
1 teaspoon vanilla
a squirt of lemon juice


Preheat oven to 400F.
To make topping: In a medium bowl, cut together with a pastry cutter the ½ cup sugar, ¾ cup flour, butter, and nutmeg until butter is in small pea-sized pieces.  You can use your fingers if you don’t have a pastry cutter, but work quickly to avoid melting the butter too much.  Put this bowl in the fridge until you're ready to sprinkle the topping on the pie.


Place strawberries in a large bowl. In a separate bowl, mix together the ½ cup sugar, ½ cup flour, and cornstarch.  Gently coat berries with this mixture, then add lemon juice and vanilla and stir in; be careful not to crush berries.  

Pour berries into prepared pie crust, mounding them in the middle.  Mounding is necessary as the berries will sink as they bake.  Cover berries with crumb topping and top crumbs with about 5 pea-sized dots of butter.  
 
Bake pie for 20 minutes, then place a drip pan on lowest shelf to catch pie juices and reduce heat to 375F and bake for an additional 40 minutes.  Wrap edges of pie crust with foil if the crust starts to brown too much.  Let cool completely before cutting – best if let sit in the fridge awhile to let the juices set.

Friday, 20 April 2012

Purple Haze

As a little birthday-present-to-self I acquired a bottle of this esoteric fluid, which has intrigued me for some time:


I love the scent of violets, and this stuff doesn't disappoint.  It's redolent of them, sweet and heady.  It's like a liquid version of parma violet candies, one of those old-fashioned sweets that I have a soft spot for.

The liqueur has even been used as a plot device in an episode of The Avengers.  Crème de violette is presented as an obscure drink which is difficult to come by and for which the criminal mastermind (naturally) has an affected penchant.  At least I'm in admirable company...  (I snorked at a line at a men's fashion show where the announcer declares a suit "champagne-resistant" - in fact the whole scene is hysterical)

While the stuff is tasty in its own right, it does best in a subtle underscoring role in mixed drinks.  The most famous cocktail made from crème de violette is the Aviation.  An interesting history of the drink and how it fell into obscurity as the liqueur vanished can be found here.

The recipe I used for this resurrected liquid confection is:

2 ounces gin
1/2 ounce lemon juice
1/2 ounce maraschino liqueur
1/4 ounce crème de violette liqueur

Put all ingredients into a cocktail shaker filled with ice.  Strain into a martini glass and add a maraschino cherry.

Delicious!


 Other recipes I look forward to trying...

Violette Royale:
4 ounces champagne
1/2 ounce crème de violette

Toulouse:
1½ ounces vodka
¾ ounce crème de violette
¼ ounce vanilla liqueur
1 teaspoon absinthe or pastis

Simplistic Beauty


Best little device ever!

Thursday, 19 April 2012

Pardonnez-moi, garçon...

...but this wine tastes like shit.


Just pray you don't get one that's corked.

Pasta and Broccoli with Bacon and Spicy Cheese Sauce

Cheese sauce is one of those things that are heavenly when homemade, and just as easy to make, in truth, as some abysmal boxed mac and cheese spackle.  And the taste is as different as ambrosia is to raw sloth spleens, so unless you have some perverse penchant for raw sloth spleens, you have no excuse not to make your own cheese sauce.  It will bring you happiness and contentment, purpose and meaning, earn you friends, get you a raise at work and the respect of your coworkers as well as the awe of young children who will gawp in goggle-eyed wonder as you leave rainbows in your wake; it will teach you to rumba and do your taxes and generally turn your life around.  A good cheese sauce can do just about anything.*


Pasta and Broccoli with Bacon and Spicy Cheese Sauce

Cook ten pieces of bacon in your preferred way.  The easiest technique is in the microwave, but if you want something more flavourful and have the time, I recommend this method.  Chop into small pieces and set aside.

Cut up into small pieces and steam two crowns of broccoli to desired doneness (don't let it turn to mush.  Just tender and bright green is best).  Set aside.

Boil whatever pasta you like according to the package directions.  It's best to use a variety that will hold the sauce well.  While doing this, make the cheese sauce.

Ingredients here are somewhat fluid, depending on how much you want to make and what consistency you like your sauce to be.  You really just need to fool around with it until you get the feel - and no mistakes are unfixable... if too thick, add milk.  If too thin, add cheese.  If the shaker top falls off the cayenne... well, sweat it out, buster.  You'll get it.  The basics, quantified where possible, are:

2-3 tablespoons butter
1-3 tablespoons flour
Milk (use whatever fat content you like, but I use nonfat (don't kill me!) and the sauce still will be thick)
Grated extra sharp Cheddar cheese
Crumbled blue cheese, the more potent the better
Sherry
Worcestershire sauce
Cayenne pepper
Black pepper, freshly ground
Nutmeg, freshly grated

In a medium saucepan, melt butter.  Add enough flour (a tablespoon or two, or three depending on how much butter you used) to make a paste.  Whisk constantly until blended - be careful it doesn't burn.  Add milk - I do 2-3 cups.  Whisk to blend into a roux.  Dribble in about a tablespoon of Worcestershire sauce and pour in about 1/4 cup sherry.  Whisk.  Turn heat to very low.  Start adding cheeses and whisk to melt them, adding enough to get the consistency you like.  If you put in a bit too much and it gets too thick, add a smidge of milk.  Whisk over very low heat until all cheese is melted and the texture becomes smooth.  Finally, stir in lots of black pepper, cayenne pepper, and nutmeg - again, whatever degree of spice you like (I like a lot).

Dish up the pasta, distribute broccoli and bacon, ladle on oceans of the cheese sauce; then sit back and wait for your life to metamorphose into a glorious apogee of beauty and oneness with the universe.  At least while you're eating.


NOM.


*Not an actual claim that cheese sauce can do anything but be delicious**

**But it actually can

Wednesday, 18 April 2012

Noshes in Notts

Recently we visited the Fine Foods Market that is occasionally hosted in Nottingham's Old Market Square.  They did indeed have much food, all of which looked mighty fine.
 

A glorious day and the beginning of the school holidays led to kids leaping around in the fountain in their school uniforms.  Pure joy!


And all the amazing goodies, and smells... everything was delicious.


We sampled fruit and custard tarts from here...

  
And bought a couple of these Italian chocolate slices - creamy rich hunks of deliciousness.


Yep.  It's a teepee.  Full of churros.


 I didn't want to interrupt this tender moment.


For breakfast one day we had kangaroo and wild boar burgers - both quite good!


 Ah, sweet, sweet pain.


Wheels within wheels...